
In this lesson, you will learn more about advanced event management.
Introdunction to the ‘on’ function in jQuery
The on() function is used in place of event-specific functions, like change or click. It allows you to specify an event, a function attached to that particular event, along with the additional parameters for the event-handling function to process. This helps to pass different data to the same event-handling function, which makes it a little more flexible approach than using the traditional way of using event-handing functions.
The syntax of the on() function is:
$("selected_element").on("event", data, functionName(){})
The first argument is a string which is the name of the event, such as click, mouseover, hover, etc. The second argument is optional; It is the data you want to pass to the function. This can be a string representation of an object literal or an object containing an object literal. An object literal is basically a list of property name and its respective values. Example:
{
    furniture: sofa,
    no_of_seats: 5;
}
You can also save an object in a variable such as:
var myobj = { message : "hello world"};
The last argument is actually a function, which does something when the event is fired. This function can either be an anonymous function or named function.
$("element").on("click", function(){} ) is same as $("element").click(function(){})
With the help of the on() function, you can also attach the same function with two or more events. For example:
$("element").on("click keypress", function(){});
In the example above, we are using two events: click and keypress. In this case, the function listed as the second argument will be executed when either the click or keypress event is fired.
This is the same as the following code:
$("element").on("click", function(){});
$("element").on("keypress", function(){});
Or writing something like the following:
$("element").click(function(){});
$("element").keypress(function(){});
Example of the ‘on’ function in jQuery
Let’s say you have a DIV with the initial opacity set to 50%. When a user clicks on the hyperlink below the DIV, the opacity of the DIV changes to 100% and stays there.
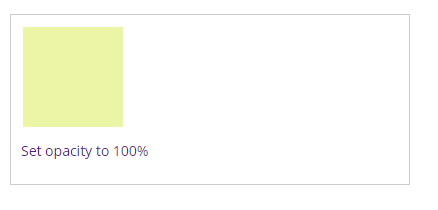
Example of ‘on’ function
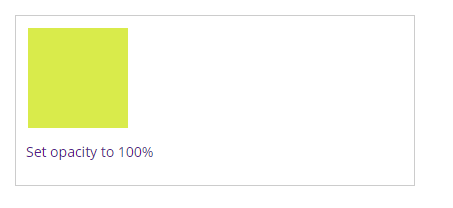
Example of ‘on’ function
The HTML
<div id="container">
   <div class="box one"></div>
   <p id="anim"><a href="#">Set opacity to 100%</a></p>
</div>
The CSS
.box {
	width: 100px;
	height: 100px;
	margin: 2px;
}

.one {
	background-color: #d9eb4b;
	opacity: 0.50
}
The jQuery
<script src = "https://ajax.googleapis.com/ajax/libs/jquery/3.4.0/jquery.min.js" ></script>
<script>
    $(document).ready(function() {
        $("#anim").click("hover", function() {
            $(".box").css({
                'opacity': '1'
            })
        });
    });
</script>
The purpose of the on() function is to add more flexibility to the code. This is what exactly jQuery promotes: write less and do more. But it depends on how you prefer to write the code. This lesson concludes our module on events. If you have any question related to events in the jQuery, you can ask in the comments section below.
| jQuery Hover Event | Tutorial Home | jQuery Forms |
Comments