
This tutorial will teach you an easy way to send an email in ASP.NET using an email template. an email template is nothing but an HTML file that you can create and customize based on your needs.
What is an Email Template?
When you have a predefined structure to achieve a task, it is known to be a template. To send emails, we can create a common structure and use it where necessary just by changing one or two variable values. This is called the Email Template.
Create the template
To begin with, let’s start by creating the template. For that create a new project and insert an HTML page to the project. Let’s name it as emailTemplate.html. In our example, we’ll be using Gmail as the authenticator and service provider. In our example, we will be replacing the receiver’s email address in the head section in our predefined template.
 <p style="font-family: sans-serif; font-size: 14px;">Hi [username],</p>
        <p style="font-family: sans-serif; font-size: 14px;">
            We have received your comment regarding your last order.
        </p>
        <p style="font-family: sans-serif; font-size: 14px;">
            Please wait for a reply from out customer support team.
        </p>
        <p style="font-family: sans-serif; font-size: 14px;">
            Thank you!
        </p>
Hi [username],
We have received your comment regarding your last order.
Please wait for a reply from our customer support team.
Thank you!
This the way it looks like after running the application. For each user, “[username]” is replaced with the user’s email address.
Configure the Web.Config file
As the email is sent across the network, we have to use the SMTP connection is to achieve this. As I said earlier we are using Gmail service provider and SMTP port for the Gmail is “587” and it is a constant value. If you are planning to use any other provider than the Gmail, the port will vary. Afterward, we need to configure our Gmail settings in the project. For that open the Web.config file in the project folder and configure the username and password of your Gmail account. It is recommended to use .NET versions above 4.5 to make sure SMTP is working.
<configuration>
  <appSettings>
    <add key="smtp" value="smtp.gmail.com"/>
    <add key="portnumber" value="587"/>
    <add key="username" value="YourEmailID@gmail.com"/>
    <add key="password" value="ABC123"/>
    <add key="IsSSL" value="true"/>
  </appSettings>
  <system.web>
    <compilation debug="true" targetFramework="4.5.2" />
    <httpRuntime targetFramework="4.5.2" />
  </system.web>
</configuration>
Create the send email form
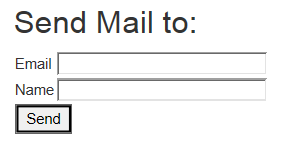
Next, we need to create the frontend of the application to get the user email and Name. For that add an ASP.NET file to the project and name it as SendEmailForm.aspx. In this page, we add a textbox to collect the Email and the name of the user and send it to the backend method using the send button. From the backend, the email template will be populated with the user’s Name and send it to the user using the SMTP service.
<body>
    <form id="mailForm" runat="server">
        <div>
            <h2>Send Mail to</h2>
            <table>
                <tr>
                    <td>Email</td>
                    <td><asp:TextBox ID="txtEmail" runat="server" Width="200px"></asp:TextBox></td>
                </tr>
                <tr>
                    <td>Name</td>
                    <td><asp:TextBox ID="txtName" runat="server"  Width="200px"> </asp:TextBox></td>
                </tr>
                <tr>
                    <td colspan="2" class="auto-style1">
                        <asp:Button ID="btnSendMail" runat="server" Text="Send" OnClick="btnSendMail_Click" />
                    </td>
                </tr>
            </table>
        </div>
    </form>
</body>
Implement the send email logic
After implementing the frontend, we need to implement the Send button in the UI. For that double click on the Send button and it will open the coding view. Inside that auto-generated method header, implement the below code.
protected void btnSendMail_Click(object sender, EventArgs e)
        {
        //In here all the configurations are loaded from the WebConfig File
        string sender = ConfigurationManager.AppSettings["sender"].ToString();
        string senderPassword = ConfigurationManager.AppSettings["password"].ToString();
        string senderHost = ConfigurationManager.AppSettings["smtpserver"].ToString();
        int senderPort = Convert.ToInt16(ConfigurationManager.AppSettings["portnumber"]);
        Boolean isSSL = Convert.ToBoolean(ConfigurationManager.AppSettings["IsSSL"]);

        //Allocate the email template we created earlier. In here we can specify either            the absolute path or the relative path
        string FilePath = ".\emailTemplate.html";
        StreamReader reader = new StreamReader(FilePath);
        string textMail = reader.ReadToEnd();
        reader.Close();

        //In here we replace the username with the email of the user
        textMail = textMail.Replace("[username]", txtName.Text.Trim());

        string subject = "Regarding your recent order";

        //Configure the Email Body
        MailMessage msg = new MailMessage();
        msg.IsBodyHtml = true;
        msg.From = new MailAddress(sender);
        msg.To.Add(txtEmail.Text.ToString());
        msg.Subject = subject;
        msg.Body = MailText;

        //Create a SMTP server to send the email
        SmtpClient smtpServer = new SmtpClient();
        smtpServer.Host = senderHost;
        smtpServer.Port = senderPort;
        smtpServer.EnableSsl = isSSL;

        //Passing the credentials of the user
        NetworkCredential credentials = new NetworkCredential(sender, senderPassword);
        smtpServer.Credentials = credentials;
        smtpServer.Send(msg);

        }
 }

I have added comments to the code to get an understanding of each and every line in the program. Finally, when the send button is clicked, the email template will be sent to the particular user. For further modification of the code, we can add user validations, more code optimizations and can even try with Yahoo and check whether which provider is faster. When the receiver gets the email, this is how it looks like at the end.
Hi Tom,
We have received your comment regarding your last order.
Please wait for a reply from our customer support team.
Thank you!
Related Articles
Comments