
Want to learn React? But do you know JavaScript well-enough? Well, in this lesson we are going to learn or revisit the basic concepts of JavaScript ES6 you are going to use while programming in React.
React JavaScript Requirements
Since its release back in 1995, JavaScript has gone throw many changes. The updates are community-driven. Anyone can submit a proposal to make a change to JavaScript, which is managed and prioritize by the ECMA committee. With Node.js, you can develop full-stack web applications using JavaScript.
The update made in 2015 was called by many names: ECMA script 6, ES6, ES2015, and ES6 Harmony. The release in 2016 was relatively small, but since then the ECMA committee is releasing updates every year.
In this lesson, you will learn about some of the major concepts of ES6 which are necessary to learn React programming.
If you haven’t switched to ES6 by now, perhaps this is the best time to do so.
Declaring variables in ES6
Earlier JavaScript had only one way to declare variables using the keyword var. We now have a few different options for different scenarios.
Let’s explore these new ways to declare variables and their differences.
Keyword var
A variable declared using the var keyword has the function scope. Meaning they are accessible within the function enclosing them.
So if you have to declare a variable with a limited scope you have to wrap your desired code inside a function (Regular or IIFE).
Example of var Keyword
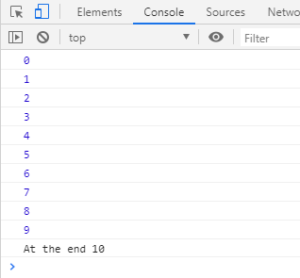
for(var i =0; i< 10; i++){ console.log(i); }
console.log("At the end "+ i);
Example of var Keyword
If you are coming different programming background, this may seem quite unintuitive to you. The variable declared using var should not be accessible outside for loop but in JavaScript, the variable declared using var keyword is hoisted at the top.
Keyword let
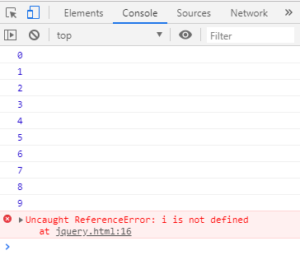
Variable declaration using the let keyword is the new way of declaring the variable in JavaScript. It allows you to declare a variable with block scope.
Example of let keyword
for(let i =0; i< 10; i++){ console.log(i);}
console.log("At the end "+ i);
Example of let Keyword
Keyword const
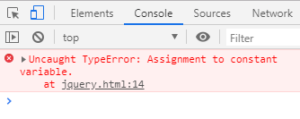
const keyword allows you to declare a read-only variable. You are allowed to declare and initialize the variable only once.
Example of const Keyword
const x = 5;
x++;
Example of const Keyword
Template String
Template string is an alternate way of concatenating strings. This also allows us to insert variables into strings. Traditionally the plus sign is used to concatenate the string. With a template, you can create a string and insert the variable value by using the ${ }.
Example of Template String
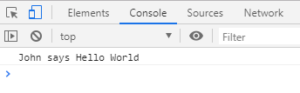
let greetings = "Hello World";
let user = "John";
console.log(user + " says " + greetings);
Example of Template String
This can also be written as:
let greetings = "Hello World";
let user = "John";
console.log(`${user} says ${greetings}`);

Template String
Arrow Functions
With arrow functions, you can write a shorter version of a function which saves time and extra type. You can focus only on the function definition with the minimal boilerplate of the function.
For example:
You can write a function as a function expression
var greetings = function(){
console.log("Hi ");
}
greetings();
Now to use an arrow function, delete the function keyword, as:
var greetings = ()=>{console.log("Hi ");}
greetings();
If the function has only one line of the code, you can even skip the curly braces.
var greetings = ()=>console.log("Hi ");
greetings();
Let’s say you have to pass a string as a parameter of the function.
var greetings = (name)=>console.log(`${name} says Hi!`);
greetings("John");
This is going to print John says Hi! on the Console.
Promises in JavaScript
I’m sure you have heard about call back functions if not used before. It is a way of telling your code that when you are done with this piece of code, execute another piece of code. Promises serve a similar purpose and make more sense when executing the asynchronous behavior, but promises are a bit more powerful because they have additional features.
To create a promise object, you can write:
let promise = new Promise(function (resolve, reject){ });
The function(resolve, reject){} is called the executor and runs automatically when the Promise is created. The promise object has internal properties:
State – pending, fulfilled, rejected.
Result – It is an arbitrary value.
There could be two things that can happen during the asynchronous request. Either everything goes as we wanted or it returned an error. The resolve is called when the job is completed successfully. The reject is called when an error has occurred.
Classes in JavaScript
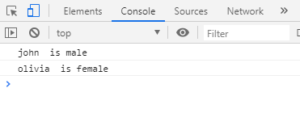
JavaScript classes contain constructor functions having a prototype property. From ES6 you can actually declare classes in JavaScript using the class keyword. Here is a simple example of a class & object creation. This class named a person has a constructor and a method which sets the gender all in one place. You can declare any number of methods inside a class definition. Currently, you can only define methods inside a class definition and not the properties which are somewhat inconvenience. The next version of the JS may probably improve this.
class person {
    constructor(name) {
        this.name = name;
    }

    setGender(gender) {
        console.log(`${this.name} is ${gender}`);
    }
}
let person1 = new person("john");
person1.setGender("male");

let person2 = new person("olivia");
person2.setGender("female");
javascriptReq6
ES6 Modules
A piece of reusable code is called a JavaScript module. This can be incorporated into other JavaScript files using the import keyword. JavaScript module is stored in a separate file – one module per file.
There are two options: you can export multiple JS objects from a single module or you can export one JS object per module.
A good module is a highly self-contained piece of code which can be added and removed from a program without any hesitation or the feel of possible disrupting the program as a whole.
Create a new file text.js. Write down the following piece of code and save it. You don’t have to use the script tag in an external js file.
export default str => str.toUpperCase();
Now back to index.html, write down the following code within <script type="module"> tag
<script type="module">
import toUpperCase from '/bears.js';
console.log(toUpperCase('test'));
</script>
This will print TEST on the console.
Now you know all these features of JavaScript ES6, let’s move to the actual coding process of React. In the next lesson, you will learn more about how to install React on your local machine.
| Introduction to React | Tutorial Home | React Environment Configuration |
Comments