
In this article, we are going to talk about the binding of datatable into a TreeView. For this, we’ll be using ADO.NET to create an instance of the database. Before getting into it, what is a TreeView? In simple terms, it is a graphical way of representing information in a hierarchical manner. It should have a parent node which holds sub-components which is called as child nodes. In C#, we have a TreeView control in the toolbox and it is collapsible. Hence, we can add any number of child nodes to a parent node which we define. To understand the concept, let’s see an example.
Bind ADO.NET DataTable to a TreeView in C#
To better understand this tutorial, you should have the knowledge of following C# programming areas:
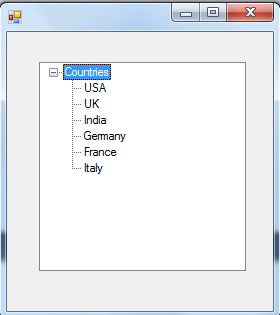
Treeview Expended Mode
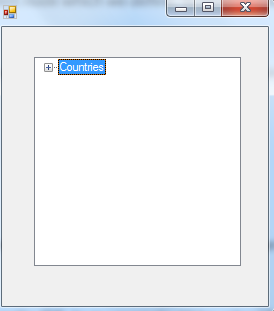
Treeview Collapsed Mode
In here Country is a parent node and nodes inside it are called child nodes. Child nodes too can act as parent nodes at some stage.
Create the Application
To begin with, first, create a new C# project in your favorite IDE. In my example, I’ll be using Visual Studio 2015 version. After creating the project, add a new TreeView to the main form by dragging and dropping from the toolbox.
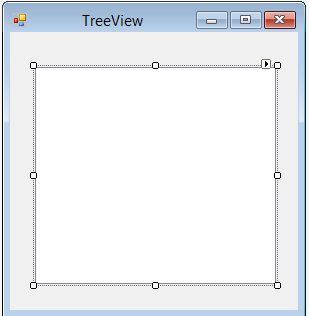
Adding a Treeview to the Form
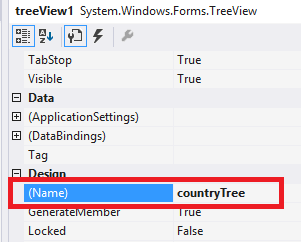
Before moving on to the coding part, let’s change the name of the TreeView to our own name. Right click on the TreeView, you just added and go to the properties tab. In the properties tab, you’ll find the name property and change it to whatever name you like. In my example, I’ll be changing it to countryTree as we are creating a Country Tree.
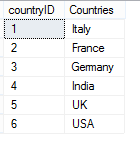
Database
In this example, we are going to use a SQL Server Database table as shown below
Data View
Bind the Datatable to the TreeView
Afterward, we need to create a method to show our fetched data in the TreeView Control. For that double click on the form and you will be directed to the .cs file. As given below, first we need to create our database connection as we normally do. From the Configuration Manager, the database instance is initialized. In this example, what we do is, we fetch all the data from the database which matches our query and store them in a datatable. Afterward, we iterate through the filled datatable and add the fields to the TreeView Control.
public void BindTreeViewWithADO(){

  //connection established; initial catalog is the name of the database
  string connectionString = "data source=VIRAJ\VIRA;initial catalog=Company;
                             integrated security=True";

  SqlConnection conn = new SqlConnection(connectionString);
  SqlDataAdapter dataAdapter = new SqlDataAdapter();
  SqlCommand command = new SqlCommand();

   //create a datatable to store data
   DataTable dataTable = new DataTable();

   int i = 0;
   int j;
   try
   {
       //querying the database
       command.CommandText = "Select countryID, Countries from CountryList
                              Order by countryID DESC";
       dataAdapter.SelectCommand = command;
       dataAdapter.SelectCommand.Connection = conn;

       //fill the data into the datatable
       dataAdapter.Fill(dataTable);
       conn.Close();

       //adding the parent node
       countryTree.Nodes.Add("Countries");

       //iterate through the datatable and adding child nodes to the parent node
       for (j = 0; j <= dataTable.Rows.Count - 1; j++)
          countryTree.Nodes[i].Nodes.Add(dataTable.Rows[j]["Countries"].ToString());
          i++;
     }
     catch (Exception e)
     {
        MessageBox.Show("Error Occurred: " + e);
     }
  }
In this example, we have set the parent node as Countries. Hence, all the entries in the Countries column will be added as child nodes to the TreeView.
Adding more functionalities
To add extra functionality to the TreeView, let’s add a click function to each child node. Upon clicking on the particular child node, the value of the child node is printed in the label below the TreeView control. For that, we can go to the properties window of the TreeView and navigate to the events tab. In the events tab, you will find the event AfterSelect and double click on it. The method signature will be automatically created in your .cs file and we can implement the method body as shown below.

TreeView Properties
    private void countryTree_AfterSelect(object sender, TreeViewEventArgs e) {
lblCountry.Text = countryTree.SelectedNode.FullPath;
    }
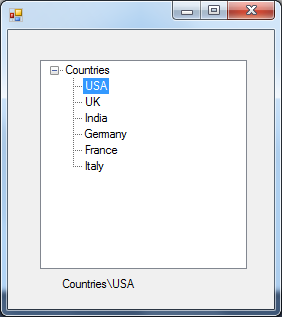
Finally, completing all the work, we are now ready to run this application. If the database connectivity is properly configured, you will get a TreeView output as below.
Output
Comments