
The process involves creating an SQL Server database that will store all the images in a tablet. The ASP.NET application will accept as input the image Name.
On the whole, it is a simple application that we are going to build and should be easily understandable for even beginners as well. So, let’s get started.
Insert and Retrieve images using ASP.NET and SQL Server Database
The tutorial assumes that there is already a database ready for the purpose. That refers to a SQL Server database where you can upload the images that we can subsequently display. Also, the table is named simply as ‘Images’.
Further, the table ‘Images’ has three fields:
- id of DataType int (PK)
- ImageName of DataType varchar(100)
- Image of DataType image.
BEGIN TRANSACTION
GO
CREATE TABLE dbo.Images
	(
	Id int NOT NULL IDENTITY (1, 1),
	ImageName nchar(100) NULL,
	Image image NULL
	)  ON [PRIMARY]
	 TEXTIMAGE_ON [PRIMARY]
GO
ALTER TABLE dbo.Images ADD CONSTRAINT
	PK_Table_1 PRIMARY KEY CLUSTERED
	(
	Id
	) WITH( STATISTICS_NORECOMPUTE = OFF, IGNORE_DUP_KEY = OFF, ALLOW_ROW_LOCKS = ON, ALLOW_PAGE_LOCKS = ON) ON [PRIMARY]

GO
ALTER TABLE dbo.Images SET (LOCK_ESCALATION = TABLE)
GO
COMMIT
The identity specification of the id field should be set to Yes as the applications will be retrieving the images using its id, which is a primary key for that table.
Create the application
- Launch Visual Studio.
- Create a new Project and give it a name, like say ‘ImagesToDisplay’.
- Next, add a webpage to your project, Default.aspx page.
- The page we are going to build will have a simple layout, having a
TextBox,Imagecontrol, aButton, and aGridView.
Here is what the Default.aspx will look like.
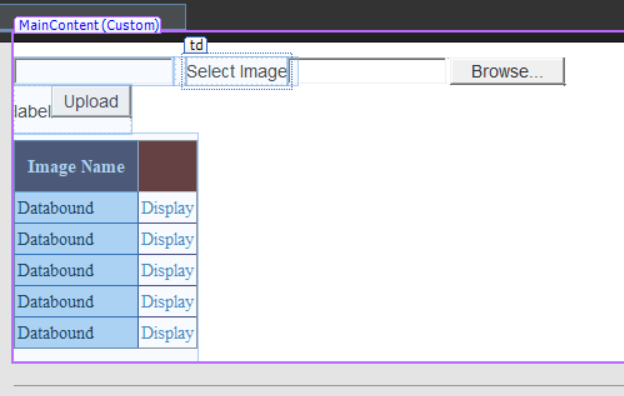
<table>
        <tr>
            <td>Name
        <asp:TextBox ID="TextBox1" runat="server" />
            </td>

            <td>Select Image </td>
            <td>
                <asp:FileUpload ID="FileUpload1" runat="server" />
            </td>

        </tr>
    </table>

    <table>
        <tr>
            <td>
                <p>
                    <asp:Button ID="btnUpload" runat="server" OnClick="btnUpload_Click" Text="Upload" />
                </p>
            </td>
        </tr>
    </table>

    <table>
        <asp:GridView CssClass="Grid" ID="gv" runat="server" AutoGenerateColumns="False">
            <Columns>
                <asp:BoundField HeaderText="Image Name" DataField="ImageName" />


                <asp:TemplateField>
                    <ItemTemplate>
                        <asp:HyperLink
                            ID="MyLink" Target="_blank"
                            NavigateUrl='<%# Eval("Id", "~/ImageHandler.ashx?id={0}")  %>'
                            runat="server">
Display
                        </asp:HyperLink>
                    </ItemTemplate>
                </asp:TemplateField>

            </Columns>
        </asp:GridView>
    </table>
Add CSS Classes to your project
    <style>
        .Grid {
            background-color: #fff;
            margin: 5px 0 10px 0;
            border: solid 1px #808080;
            border-collapse: collapse;
            font-family: 'Times New Roman';
            color: #000000;
        }

            .Grid td {
                padding: 2px;
                border: solid 1px #363670;
            }

            .Grid th {
                padding: 10px 10px;
                color: #fff;
                background: #552525;
                border-left: solid 1px #525252;
                font-size: 1em;
            }
    </style>
Insert Image into SQL Database
Now, we need to create a method to upload the images to the database in the first place before we can display back the images. Here is the code for the same.
    private void SaveImage()
    {
        if (FileUpload1.HasFile)
        {
            int imagefilelenth = FileUpload1.PostedFile.ContentLength;
            byte[] imgarray = new byte[imagefilelenth];
            HttpPostedFile image = FileUpload1.PostedFile;
            image.InputStream.Read(imgarray, 0, imagefilelenth);
            SqlConnection con = new SqlConnection("Data Source=localhost;Initial Catalog=myDatabase;Integrated Security=True");

            SqlCommand cmd = new SqlCommand("Insert into Images (ImageName, Image) values (@ImageName, @Image)", con);
            con.Open();
            cmd.Parameters.AddWithValue("@ImageName", SqlDbType.VarChar).Value = TextBox1.Text;
            cmd.Parameters.AddWithValue("@Image", SqlDbType.Image).Value = imgarray;
            cmd.ExecuteNonQuery();
            BindGrid();
        }
    }
Thereafter, call this function from the btnUpload_Click function
    protected void btnUpload_Click(object sender, EventArgs e)
    {
        SaveImage();
    }
Next, create the method to bind to the GridView, which will be displaying the images in the ‘Images’ table.
    public void BindGrid()
    {
        SqlConnection con = new SqlConnection("Data Source=localhost;Initial Catalog=myDatabase;Integrated Security=True");

        SqlCommand cmd = new SqlCommand("Select id, ImageName, Image from Images", con);
        con.Open();
        SqlDataReader dr = cmd.ExecuteReader();
        gv.DataSource = dr;
        gv.DataBind();
    }
Thereafter,call the methid BindGrid() inside the Page_Load() event:
    protected void Page_Load(object sender, EventArgs e)
    {
        if (!Page.IsPostBack)
        {
            BindGrid();
        }
    }
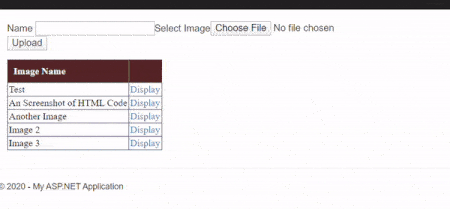
Display Image from SQL Database
To display images, we need to add a Handler file for retrieving the image from the database. That’s because the images are saved in binary format, and Handler class is needed to retrieve data that has been so formatted.
To add Handler Class to our project:
- Right-click on the project and select generic Handler.
- This will add a new Handler1.ashx file to the project. Rename the Handler to ImageHandler.ashx
Next, open ImageHandler.ashx.cs and add the following code.
    public void ProcessRequest(HttpContext context)
    {
        string imageId = context.Request.QueryString["Id"].ToString();
        SqlConnection con = new SqlConnection("Data Source=localhost;Initial Catalog=myDatabase;Integrated Security=True");

        SqlCommand cmd = new SqlCommand("select Image from Images where id=" + imageId, con);
        con.Open();
        SqlDataReader dr = cmd.ExecuteReader();
        dr.Read();
        context.Response.BinaryWrite((Byte[])dr[0]);
        context.Response.ContentType = "image/jpg";
        context.Response.End();

    }
Summary
This is a simple application where we build a page that enables the user to upload an image, which then gets displayed on the web page. This can serve as a sort of a template for users to develop more complex pages though the basic logic for uploading to or displaying an image from the database remains basically the same.
Comments