
This article will elaborate on the method to delete multiple rows in the ASP.NET GridView control.
Delete multiple rows in an ASP.NET grid using C#
Let get started by adding an Employees Table to the Database
The SQL Server database:
Let’s assume you have a database where records of all the employees are stored.
For the sake of simplicity, let’s also assume the Employee database has only a few fields, namely,
- ID
- Name
You can use this statement to create the SQL table:
SET ANSI_NULLS ON
GO

SET QUOTED_IDENTIFIER ON
GO

CREATE TABLE [dbo].[Employees](
	[ID] [int] IDENTITY(1,1) NOT NULL,
	[Name] [nvarchar](50) NULL,
	[Email] [nvarchar](50) NULL
) ON [PRIMARY]
GO
Add few Records to the newly created table:
INSERT INTO [dbo].[Employees]
           ([Name]
           ,[Email])
     VALUES
           ('Scott'
           ,'scott@email.com')
GO

INSERT INTO [dbo].[Employees]
           ([Name]
           ,[Email])
     VALUES
           ('Bella'
           ,'bella@email.com')
GO

INSERT INTO [dbo].[Employees]
           ([Name]
           ,[Email])
     VALUES
           ('Ed'
           ,'ed@email.com')
GO

INSERT INTO [dbo].[Employees]
           ([Name]
           ,[Email])
     VALUES
           ('Peter'
           ,'peter@email.com')
GO
Creating the ASP.NET application
We can now move on to creating the ASP.NET application where we can select multiple rows in a GridView control and delete the same.
Let’s first create the ASP.NET project and add a new ASPX page to it:
To do that, launch Visual Studio.
- Click on File > New > Website.
- In the window that opens, select Visual C# from the options on the left.
- Select ASP.NET Web Forms Site.
- Name it as ‘Delete_Multiple_GridView_Rows’.
Thereafter, in the Solution Explorer section,
- Rightclick on Delete_Multiple_GridView_Rows.
- Select Add > Add New Item.
- In the Add New Item window that opens, select Web Form under the Visual C# option shown on the left.
- Name the item DeleteGridView.aspx
In the DeleteGridView.aspx page, add the following code:
<div>
<table>
<tr>
<td>Delete Multiple Rows In ASP.NET Grid View
</td>
</tr>
<tr>
<td>
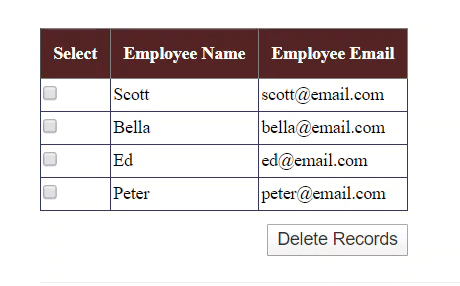
<asp:GridView ID="GridViewEmployee" CssClass="Grid" runat="server" DataKeyNames="ID" AutoGenerateColumns="False">
<Columns>
<asp:TemplateField HeaderText="Select">
<ItemTemplate>
<asp:CheckBox ID="chkSelect" runat="server" />
</ItemTemplate>
</asp:TemplateField>
<asp:BoundField DataField="Name" HeaderText="Employee Name" />
<asp:BoundField DataField="Email" HeaderText="Employee Email" />
</Columns>
</asp:GridView>
</td>
</tr>
<tr>
<td align="right">
<asp:Button ID="btnDeleteRecords" Text="Delete Records"
runat="server" />
</td>
</tr>
</table>
</div>
Add the CSS style to your page
    <style>
        .Grid {
            background-color: #fff;
            margin: 5px 0 10px 0;
            border: solid 1px #808080;
            border-collapse: collapse;
            font-family: 'Times New Roman';
            color: #000000;
        }

            .Grid td {
                padding: 2px;
                border: solid 1px #363670;
            }

            .Grid th {
                padding: 10px 10px;
                color: #fff;
                background: #552525;
                border-left: solid 1px #525252;
                font-size: 1em;
            }
    </style>
Add the following function to the CS file:
    private void BindGrid()
    {
        SqlConnection con = new SqlConnection();
        DataTable dt = new DataTable();
        con.ConnectionString = @"Data Source=localhost;Initial Catalog=Employees;Integrated Security=True";
        SqlCommand cmd = new SqlCommand("Select * From Employees", con);

        SqlDataAdapter da = new SqlDataAdapter(cmd);
        da.Fill(dt);
        con.Open();
        cmd.ExecuteNonQuery();
        con.Close();

        if (dt.Rows.Count > 0)
        {
            GridViewEmployee.DataSource = dt;
            GridViewEmployee.DataBind();
        }
    }
Now call this method from the page_load:
    protected void Page_Load(object sender, EventArgs e)
    {
        if (!Page.IsPostBack)
        {
            BindGrid();
        }
    }
Double click on the ‘Delete Records’ button and add the following code.
    protected void btnDeleteRecords_Click(object sender, EventArgs e)
    {
        DataTable dt = new DataTable();
        dt.Columns.AddRange(new DataColumn[2] { new DataColumn("Name", typeof(string)),
                new DataColumn("Email",typeof(string)) });

        foreach (GridViewRow row in GridViewEmployee.Rows)
        {
            if ((row.FindControl("chkSelect") as CheckBox).Checked)
            {
                int ID = Convert.ToInt32(GridViewEmployee.DataKeys[row.RowIndex].Value);
                using (SqlConnection con = new SqlConnection(@"Data Source=localhost;Initial Catalog=Employees;Integrated Security=True"))
                {
                    con.Open();
                    SqlCommand cmd = new SqlCommand("DELETE FROM Employees WHERE ID=" + ID, con);
                    cmd.ExecuteNonQuery();
                    con.Close();
                }
            }
        }

        this.BindGrid();
    }
Summary:
In this article, we discussed how to select several rows in a GridView control and then hit the Delete button to remove all the selected rows at one go.
Related Articles
Comments