
In this lesson, you will learn the basics of Ajax and how it used with jQuery.
Introduction to Ajax
If you search something for Google, it shows you a relevant list of suggestions without refreshing the page. This is achieved through Ajax. It is not a new technology but a term describe some of the existing technologies when using combined. Ajax stands for Asynchronous JavaScript and XML. It is used to fetch and display new content from the webserver without loading or refreshing the entire web page.
How does Ajax work?
In Ajax, you use JavaScript to send a request from your web page to the webserver, which, sends some data back as a response to your request without reloading the page. This all happens asynchronously.
Ajax works on three different components:
The web browser – You need a web browser to run web pages and JavaScript but you need a web browser for one more thing. – XMLHttpRequest object. This was introduced in Internet Explorer but now all web browsers have this object to interact with the webserver.
JavaScript – It sends a request to the web server, waits for a response, and updates the content of the web page depending on what your program wanted to achieve – displaying data from the database or a simple login message based on the sign-in process.
The web server – It receives a request from the web browser and sends some HTML, plain text, or XML/JSON data back to the browser. At the webserver, there might be a web server, application server, and database server involved to process the user’s request.
For example, if a web browser requests to fetch 10 latest database entry records from a specific table, the web server will shift the control to the application server, which extracts information from the database server and prepares it to send it back to the browser.
Ajax and jQuery
Some people find using Ajax with JavaScript too complicated. The good news is, jQuery provides several functions such as load(), get(), post(), and ajax() that simplify the entire process.
The load() function
The load() function is the simplest function offered by jQuery. This function can load an entire HTML page into a selected web element. To use the load() function, simply select a web element you want to display the HTML response, and then call the load() function. You need to pass the URL of the page you want to load the HTML from.
For example, $(".msg").load("todays_news_html");
The get() and post() methods
The load function is a quick way to extract HTML from a webserver and display it into a page. But what if you want to display some data( JSON, XML, etc.) rather than plain HTML?
The basic syntax of these functions is:
$.get (url [,data] [, callback function])
$.post (url [,data] [, callback function])
Unlike other jQuery functions, you don’t need to attach get() or post() function with any web element. These two functions stand by themselves and are not attached to any element on the page. Simply use the $ symbol, followed by a period and the function name.
Theget() and post() functions accept three arguments:
URL – It is a string that represents the path to the file that processes the data on the webserver.
Data – It is the data you need to send to the webserver for the processing. This could be a string, or a JavaScript object literal.
Callback function – In case, the response is returned from the webserver successfully, the callback function is executed, which further proceed with the processing of information being returned.
An object literal is a JavaScript function for saving variable/value pair.
{
name: "John",
nationality: "American "
}
You can pass the JavaScript object literal directly to the get() or past() function.
Such as:
$.post( "file.php " , {name: "john ", nationality: "American "}) ;
You can also use:
let data = {name : "john", nationality: "American"}
$.post( "file.php", data);
Another popular format for sending data is called JSON, which stands for JavaScript Object Notation. It is structured like a JavaScript object.
Here is a simple example of JSON.
{
"firstname" : "John",
"hobby": "Travelling"
}
Example of Ajax and jQuery
In this example, we have only one text input field that takes a user’s name. After the user enters his name and clicks on the button, the Ajax request will send username and fetch a string ‘Welcome username’ as a response.
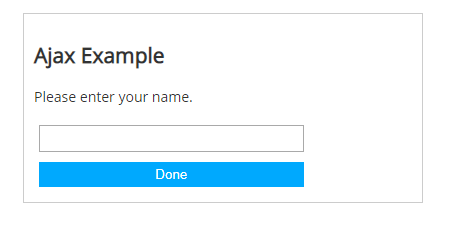
Ajax and jQuery Example
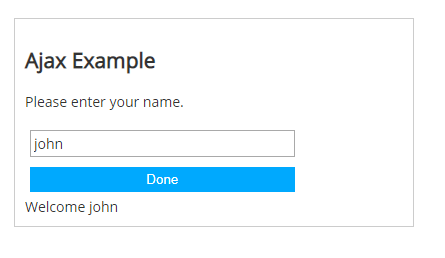
Ajax and jQuery Example
The HTML
<h2>Ajax Example</h2>
<p>Please enter your name.</p>
<input type="text" name="username" id="username">
<br>
<button id="btn" class="submit">Done</button>
<div id="result"></div>
</div>
The CSS
input,
button {
	margin: 5px;
	padding: 2px;
	width: 70%;
}

.submit {
	color: white;
	background-color: #00A9FE;
	border: 0;
	outline: none;
	padding: 5px;
}

#container {
	margin: 20px;
	padding: 10px;
	border: 1px solid #ccc;
	width: 400px;
}
The jQuery
<script src = "https://ajax.googleapis.com/ajax/libs/jquery/3.4.0/jquery.min.js" ></script>
<script>
    $(document).ready(function() {
        $("#btn").click(function() {
            var uname = $("#username").val();
            $.ajax({
                type: "GET",
                url: "file.php",
                data: "uname=" + uname,
                cache: false,
                success: function(data) {
                    $("#result").text(data);
                }
            });
        });
    });
</script>
This is the last lesson in the jQuery series. All the examples were written in plain English for everyone to understand it without any help, but if you have any query, you can contact via email or leave your question in the comments section below.
| jQuery Form validation | Tutorial Home |
Comments