
In this tutorials, I’m going to demonstrate how to add a Column Dynamically to a DataTable in C#, then show the results in a GridView.
Introduction to dynamic nature of the dataTable
It is important to follow every step given in this article to add columns to the dataTable dynamically in a C# environment. Some of you might have a question, what do you mean by adding columns dynamically? In simple terms, we add data to the dataTable including the column headers when an application is running. This action is called as adding data Columns dynamically. In this example, we will be creating a new dataTable object and populate it with some data during the runtime.
To start with, first, we need to create a simple WindowsForm Application project and add a GridView by dragging and dropping from the toolbox. For your easiness, you can change the name of it to whatever name you like. In my point of view, I’ll keep the default name which is “gv”. Next, we need to create our method to invoke when the page loads, hence we can either write the code directly inside the FormLoad method or create a new method and call it from the form load method. In this example, we are going to create a new method and call it inside the FormLoad method to avoid complications.
How to add the columns dynamically?
Let’s create new method viewInDataTable() to add columns dynamically.
private void viewInDataTable() {

//create the data table instance
DataTable dataTable = new DataTable();

//add column names to the data table
dataTable.Columns.AddRange(new DataColumn[3] {
                           new DataColumn("invoice_no", typeof(int)),
                           new DataColumn("old_item_code", typeof(string)),
                           new DataColumn("new_item_code",typeof(string)) });
//add the data to the table at runtime
dataTable.Rows.Add(2009, "51111", "US51111");
dataTable.Rows.Add(1231, "34211", "US34211");
dataTable.Rows.Add(1001, "23212", "US23212");
dataTable.Rows.Add(2345, "50001", "US50001");
dataTable.Rows.Add(2111, "11111", "US11111");

//bind the data to the gridview
gv.DataSource = dataTable;
gv.DataBind();

}
After creating the dataTable instance, we need to specify the columns which we are going to show at the runtime. DataTable has its property called “Columns” which used to set the column headers. As there are several columns, we use the AddRange() method to add the entire collection of headers to the table. The AddRange() method is typically used as the replacement for the for-each loop since loops can get vulnerable in complex situations. In this example, we have added 3 column names “invoice_no,” “old_item_code” and “new_item_code” to the column list.
After specifying the column headers, we need to add the data to the table. As we are dynamically adding the data, we don’t use any entity class or a database to fetch the data. We hardcode all the possible data that need to be added at the runtime. For that, we use the “Rows” property available in the dataTable class and calls the add method to add the data to each column. Finally, we need to bind the dataTable to the grid View we added to the form. Hence we are using the method DataBind() which establishes the connection between our WinForm and the logic.
Also, it will automatically update the grid upon any change done at the runtime.
Call the method from the Form Load
Now, we have completed our method to add columns to the dataTable dynamically. Next thing we must do is to call the method inside the FormLoad method. To access the FormLoad method, double click on the form we created earlier, and you will be directed to the method body.
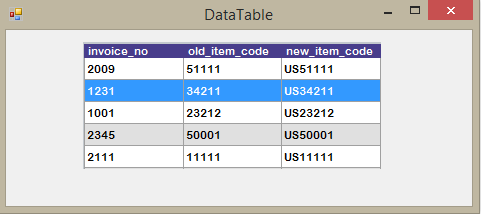
DataGrid View
Comments